ON Collection Instructions
Thanks for buying from our ON collection! You may think they are so simple that they don't really require any instructions, but we thought it would be nice to give you a few tips.
ON Concept
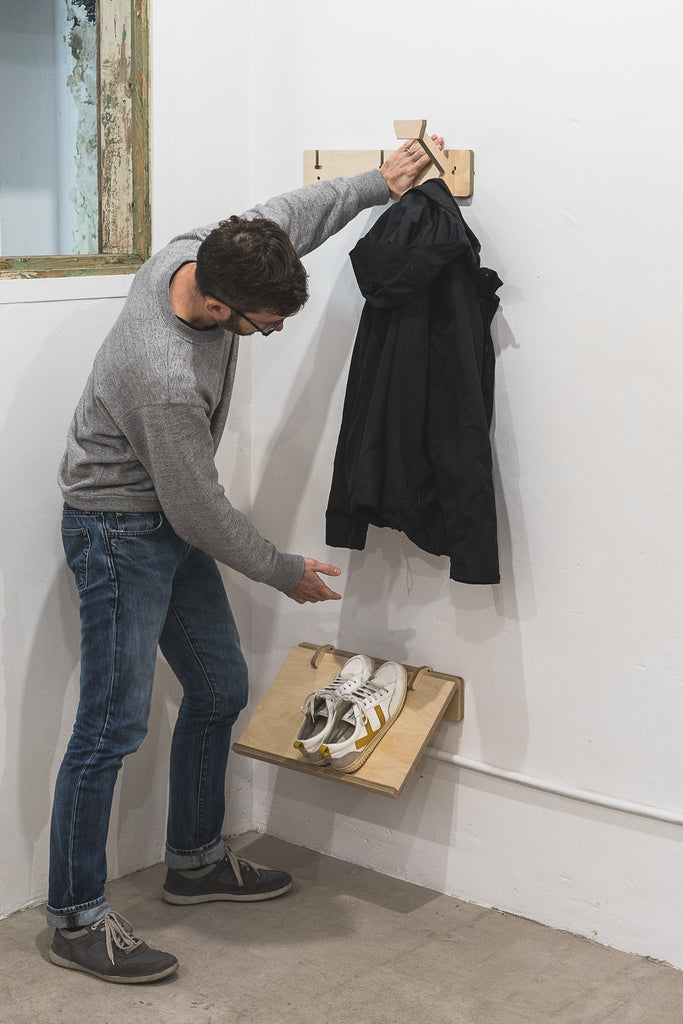
All ON products follow a simple concept: a flat piece of wood with holes is secured to the wall using 2 or more screws

and the other components are added later by sliding them with care into position.

Note: Whilst the wood is strong and the cut is very precise, please don't use too much strength to force the pieces into place or to remove them, as they could break. In the unfortunate event you did break them, send us a picture and we will send a replacement piece at our production cost + shipping.
Drilling holes
The very first step to place your ON item on the wall is to decide where to put it and mark the holes.
Advice: Think well about the height of the final product before marking where the holes will go!
Once you decided the position of the object, you can use the hole in the support to mark their position just by inserting a small screw driver and marking the wall.
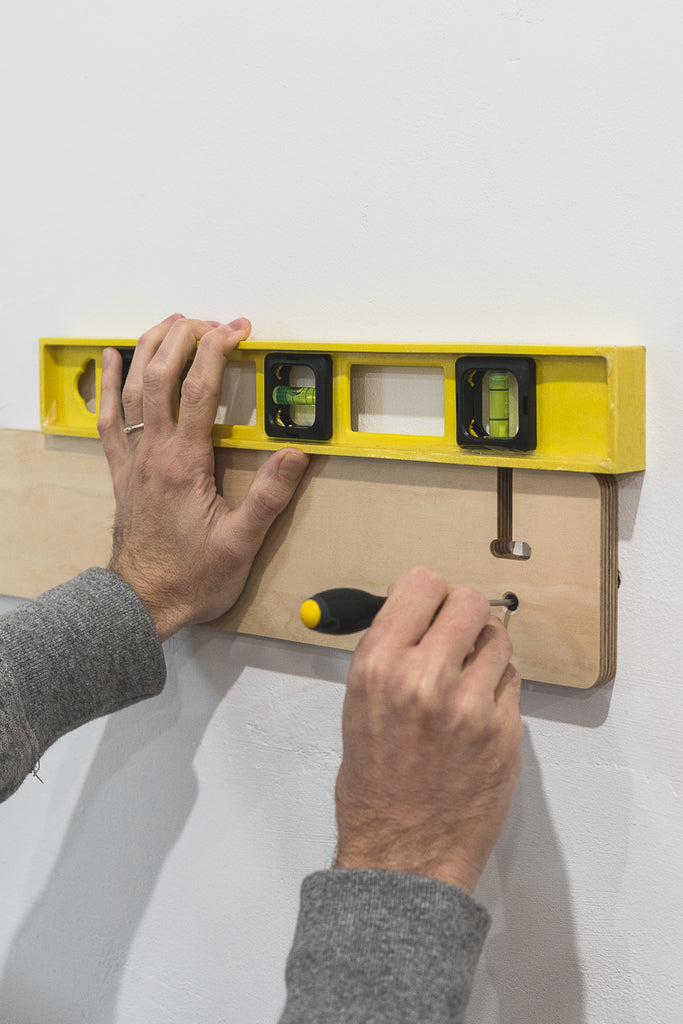
Use a level bar to ensure the piece is straight OR make one hole and part place the support on the wall before marking the second hole, it will be easier to use the level bar or seeing if straight when one screw is already in place.
Advice: walls can be a pain and drilling a big hole right away can be difficult. As we recommend using strong 8 mm plugs, you can start by drilling a smaller hole with a 4 mm bit, before enlarging it to 8 mm.
Screw types
Screws can come with a round or flat head. It's important you use screws with a flat head so that they will stay flush to the wall support without sticking out otherwise, they won't allow the pieces to slide in from of them.

Wonky walls
If your wall is not straight and you are putting a 3 holes piece on the wall, you may want to use a small filler behind the support to ensure it is still straight, otherwise, you may struggle to add the final components. Cutting a bottle cork with a whole in the middle is an easy and cost effective way of building a filler of the thickness you need.
Fixing the sliding parts
Once your wall support is firmly attached to the wall, you can add the sliding parts. When you do, be careful to do it slowly. If you feel too much resistance, check there isn't anything obstructing the object before forcing it.
If you do need to push it harder, you can do it by using a small hammer and a third object in between to avoid damaging it, for example, a screwdriver.
If you need to remove it, the same principle applies, just give small vertical hits to the piece from the bottom, until it slides enough to be removed by hand.

ON #5 Plant hanger pots
The plant hanger hole has a width of 13 centimetres. It was designed to fit IKEA metal and plastic pots perfectly, as they are easy to find.

However, you can also use a rubber gasket tape to reduce the diameter and adapt it to smaller pots, whether they are metal, plastic or ceramic/terracotta.

In general, we recommend using a decorative, exterior pot and place the actual plant in another plastic pot that fits inside, so it's easy to remove and water or replace. Depending on how good is your wall and wall plugs, you may want to avoid putting heavy plants or pots.